
If you’re reading this, you’ve probably heard all the recent buzz around Google Analytics 4 (GA4). With all the new feature rollouts, it will be a completely different analytics reporting platform compared to the previous version, Universal Analytics (GA3).
While some aspects of GA4 are ready to be utilized now, it will take time before anyone is ready for a complete transition to GA4. To help ease this transition period, dual tagging is becoming the most recommended way to prepare for the next generation of Google Analytics. But where do you start? Why is it so important, and when should you begin this process? Keep reading and we’ll dive into everything you need to know about dual-tagging.
What Is Dual Tagging?
Dual Tagging refers to the implementation process of deploying Google Analytics GA4 Tags alongside your pre-existing Universal Analytics tags. In doing this, you’re essentially allowing for the website’s measurement data to be sent to both a UA and GA4 property. This way, you not only keep capturing/seeing analytics data the way you’re used to, but you also get a glimpse into what to expect in the new version of Google Analytics.
When To Start
Right now is the best time to get started. We recommend that all organizations implement dual-tagging ahead of the eventual transition to Google Analytics 4 properties. Google is frequently adding shiny new features to GA4, and eventually, there will no longer be any feature parity between it and Universal Analytics.
Starting dual tagging now is important for two primary reasons:
- Familiarity: GA4 is the future of Google Analytics and you’ll want to start becoming more familiar with the new data model and features (including improved YouTube media measurement, User ID remarketing, unified app and web reporting) as soon as possible. Dual tagging allows your current UA property to remain the source of truth until you’re more familiar with GA4 and certain that it’s ready to meet all your reporting needs.
- Historical Data: GA4 is not retroactive. The property will only collect data from the time of creation and it will not import the historical data from your UA properties. The more web data you collect in a GA4 property now, the easier it will be to view historical trends, make decisions based on that data, and build richer audiences and insights when GA4 becomes the golden standard for your analytics reporting in Google Analytics.
Dual tagging for basic measurement and data collection
Moving forward, this blog will be walking through implementation by using GTM, however, it’s important to note that there are four primary, yet different, implementation methods for setting up GA4 data collection.
Primary methods for GA4 implementation include:
- Using GTM (preferred option)
- Freshly installing the GA4 property code snippet
- Adding a new ‘config’ directive to an existing gtag.js implementation
- Connected Site Tags
What’s incredible is that all four methods will give you access to pageview, enhanced measurement, and automatically collected event tracking right out of the box. This will potentially provide up to 11 different events that can be used in reporting and analysis without having to set up custom event tracking.
How to Dual Tag Using GTM
GTM is typically the preferred implementation option because it is relatively straightforward, doesn’t require any changes to your code, and can be finished within 60 minutes.
This setup can be broken down into four steps:
- Create a new Google Analytics 4 property
- Create a data stream
- (Optional) enable enhanced measurement
- Enable data collection
Step 1: Create a new Google Analytics 4 property
First, let’s create a new GA4 property. There are two different ways you can create a GA4 property from your Google Analytics account:
- Click “+ Create Property”
- Click the “Setup Assistant”
In the first method, you will have to set up your GA4’s property details, such as the property name, the reporting time zone and currency, and provide some business information. For the second method, you’d click “Get Started,” which will create an entirely new GA4 property and copy the property details I mentioned above from the Universal Analytics property you’re currently in.
Step 2: Create a data stream
Next, create a data stream which is a flow of data from your website or app.
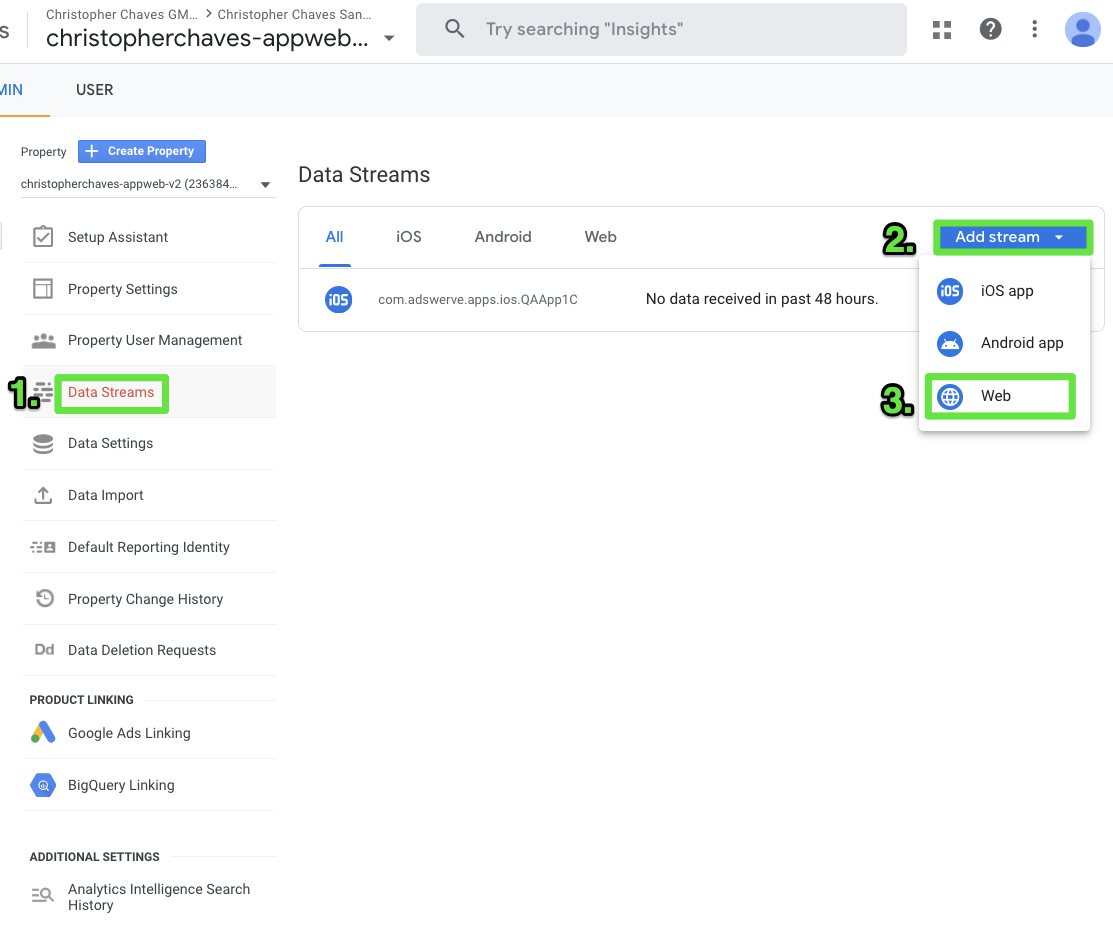
To make a new web data stream, navigate to your newly created GA4 property and click on the Admin settings in the bottom left. Under the Property column within the Admin settings, select “Data Stream”. Now click “Add stream” and select “Web”. Refer to my screenshot below to demonstrate these steps. After following these steps, a new “Set up data dream” window will appear.
Step 3: (Optional) enable enhanced measurement
Now, enter the domain where data collection will occur and then give a name to your data stream. Clicking the gear icon will give you the option to control which event tracking from enhanced measurement is enabled or disabled. In this walkthrough, we’ll leave the enhanced measurement enabled, although you can disable all enhanced measurement by clicking the blue toggle on the “Set up data steam” window.
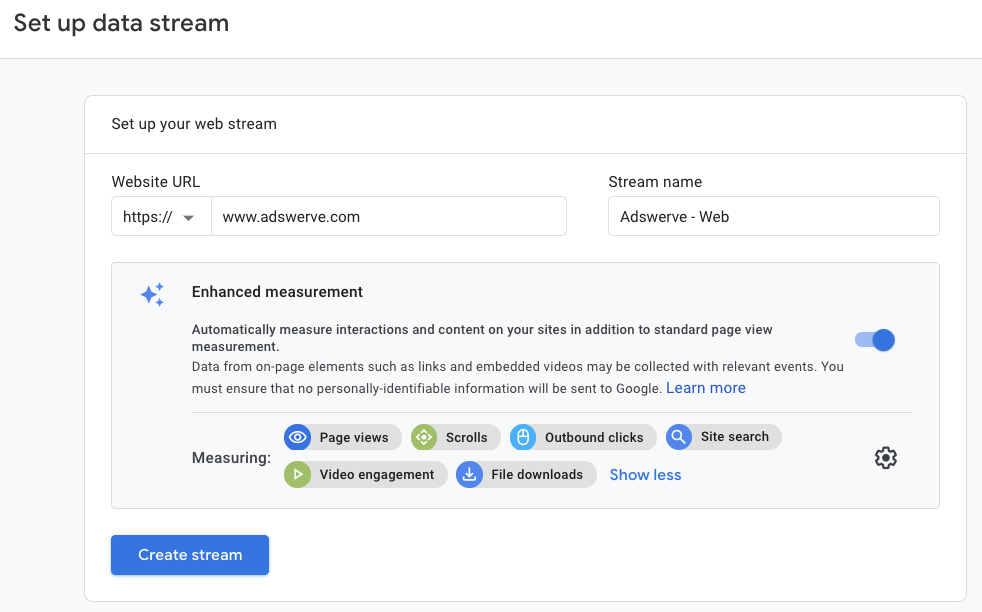
Next, select “create stream” to create your web data stream. A new window will appear with additional settings and information.
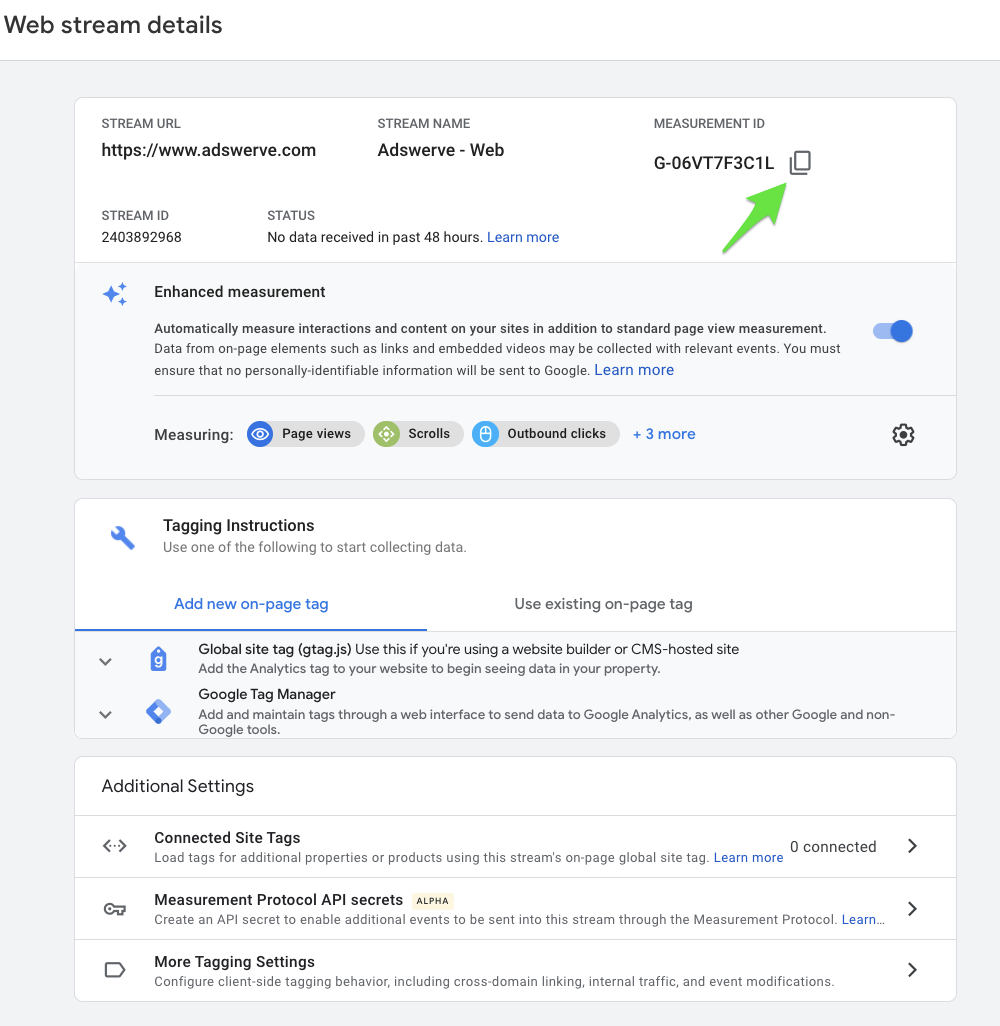
Of particular interest is the “More Tagging Settings'' where you can set up cross-domain tracking, specify domains you don’t want to be considered for referral traffic, modify and create events, and define internal IP addresses to be excluded from reporting.
For now, let’s copy the Measurement ID. We’ll use this later when making configurations in GTM.
Step 4: Enable data collection
Good news, we’re almost finished! Moving along, we’ll create a GA4 Tag in GTM to invoke our newly created web data stream for data collection.
To create a GA4 tag, navigate to the GTM container that’s associated with the domain you entered into the web date stream you created. We’ll be creating a new tag, specifically the GA4 configuration tag. This tag initializes the data collection for the associated GA4 property and triggers the automatic events and enhanced measurement events (if enabled). This is effectively the new Google Analytics settings variable.
As a best practice, let’s create a new workspace for your GA4 tag configurations and name it appropriately. Then click “New Tag” and click “Choose a tag type to begin setup.” From the options available, select “GA4 Configuration”.
Remember when you copied the Measurement ID earlier when we created the web data stream? Paste that into the Measurement ID field. Keep the option “Send a page view event when this configuration loads” enabled as this option will enable page_view event tracking. If you plan to configure a custom GA4 tag for tracking page views, you’ll want to come back and disable this option to avoid triggering duplicate page_view events on your website.
Lastly, click the triggering area to add a trigger condition and select the All Pages trigger. Your configuration should look similar to what I have below.
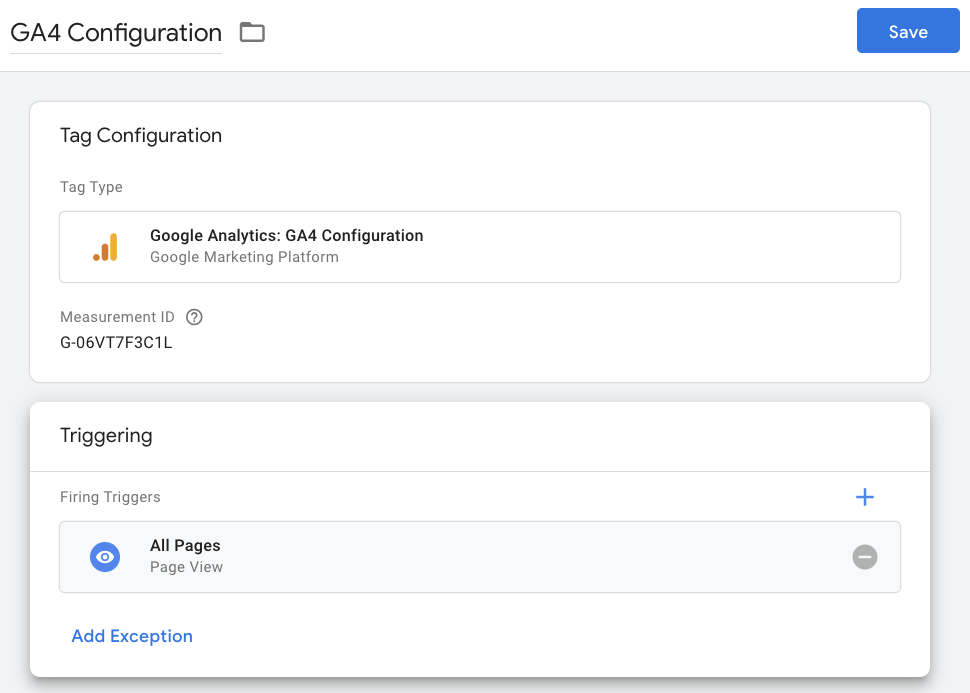
Once you’ve verified your GA4 configuration tag looks similar to my configuration above, save the tag. When you’re ready, publish the container while naming the version and typing notes on the configurations made in the workspace.
Before we get too excited, let’s quickly confirm the GA4 tracking has been set up correctly and is actively collecting data. To do this, go to your website and click around to load a few pages. In a different tab, go to your newly created GA4 property and navigate to the Realtime report. You should see page_view event activity appear in the report.
BAM! You’re finished and have successfully set up basic measurement and data collection for GA4! How long did it take you? Hopefully not too long.
Now What?
While you’re waiting for your GA4 property to start filling with data, you can check out Google's GA4 demo account that already has tons of data for you to play around with. Refer to my coworker’s blog post where they talk about how you can build your GA4 skillset leveraging the GA4 demo property.
Want to learn more about GA4? Check out two videos Adswerve put out recently, new conversion and event features and getting started with BigQuery and GA4. And if you need additional help or have questions, please don’t hesitate to reach out and our team will be in touch.