Two weeks ago, I wrote a quick teaser about the recent changes announced by Optimizely. Now anyone can create a free account and start optimizing their web and mobile apps through A/B testing. Optimizely's mobile SDK takes a fair bit of setup to get going, but once you have it up and running, it's a bit like magic; allowing you to point and click your way to a new interface design, immediately see the changes in the app running on a real device, then publish the A/B test with a single click.
In an effort to show just how easy it is to get started with Optimizely for iOS, here's a short tutorial that will take you from creating a new account with Optimizely and installing Xcode, to a working A/B test implementation in about 30minutes. Without further ado, let's start optimizing.
1. Create a New iOS App
Download and install Xcode 6 from the App Store, or using this link:
Xcode 6.1
With Xcode installed, create a new Project (Command+Shift+N or
File->New->Project)
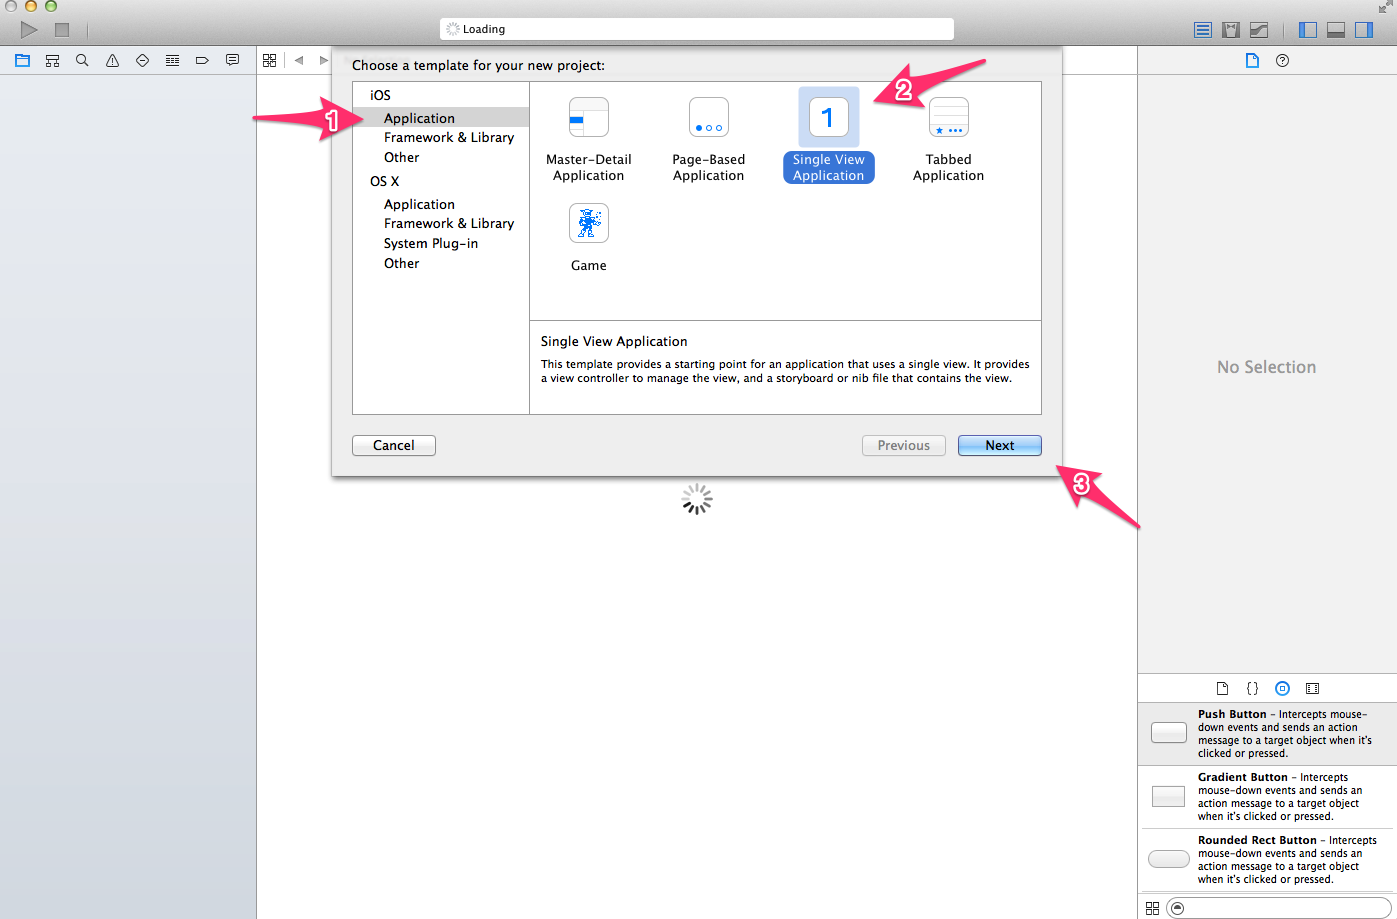
- Select the “iOS Application” type
- Choose the “Single View Application” template type
- Click “Next”
[caption id="" align="alignnone" width="600"]
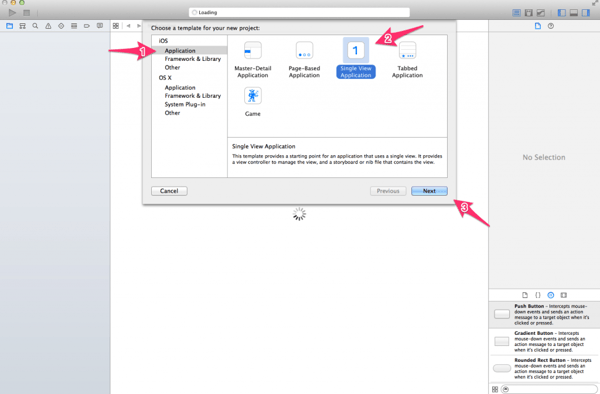 Optimizely: choosing a template for your new project[/caption]
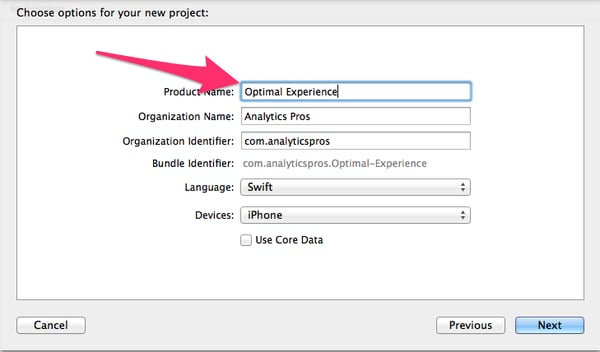
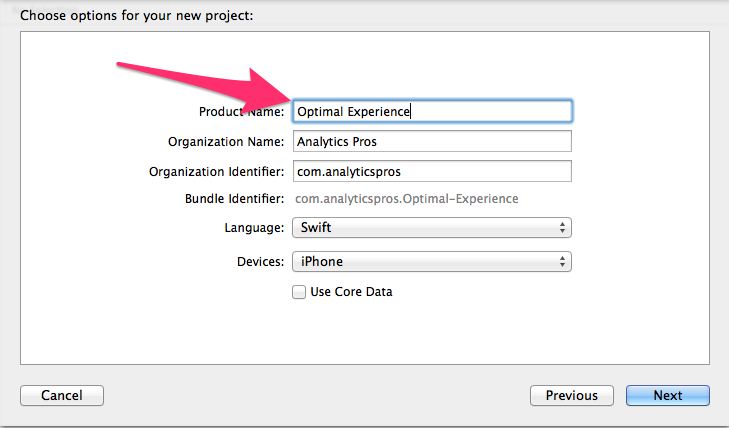
On the next screen, fill out the form, using “Optimal Experience” for the Product Name and Swift for the Language. Use whatever info you like for the other fields. [caption id="attachment_8559" align="alignnone" width="600"]
Optimizely: choosing a template for your new project[/caption]
On the next screen, fill out the form, using “Optimal Experience” for the Product Name and Swift for the Language. Use whatever info you like for the other fields. [caption id="attachment_8559" align="alignnone" width="600"]
 Choose options for your new Optimizely projec[/caption]
2. Optimizely Account Setup
Create a free Optimizely account by pointing your browser to
https://www.optimizely.com/ and clicking “Sign Up”
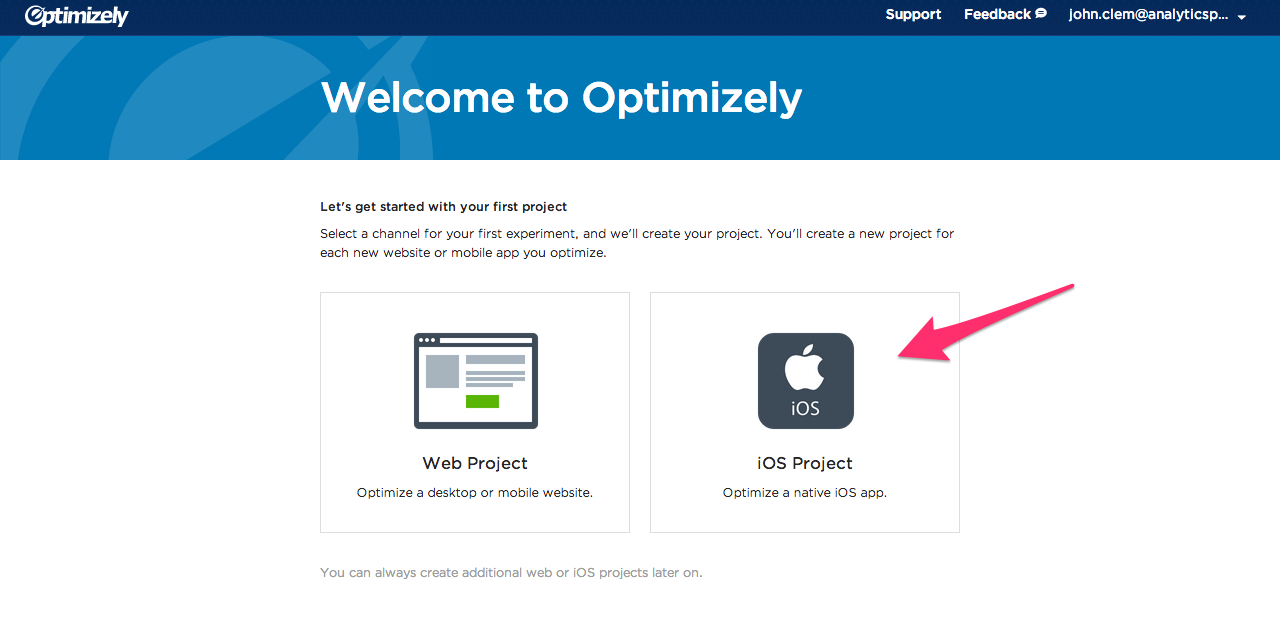
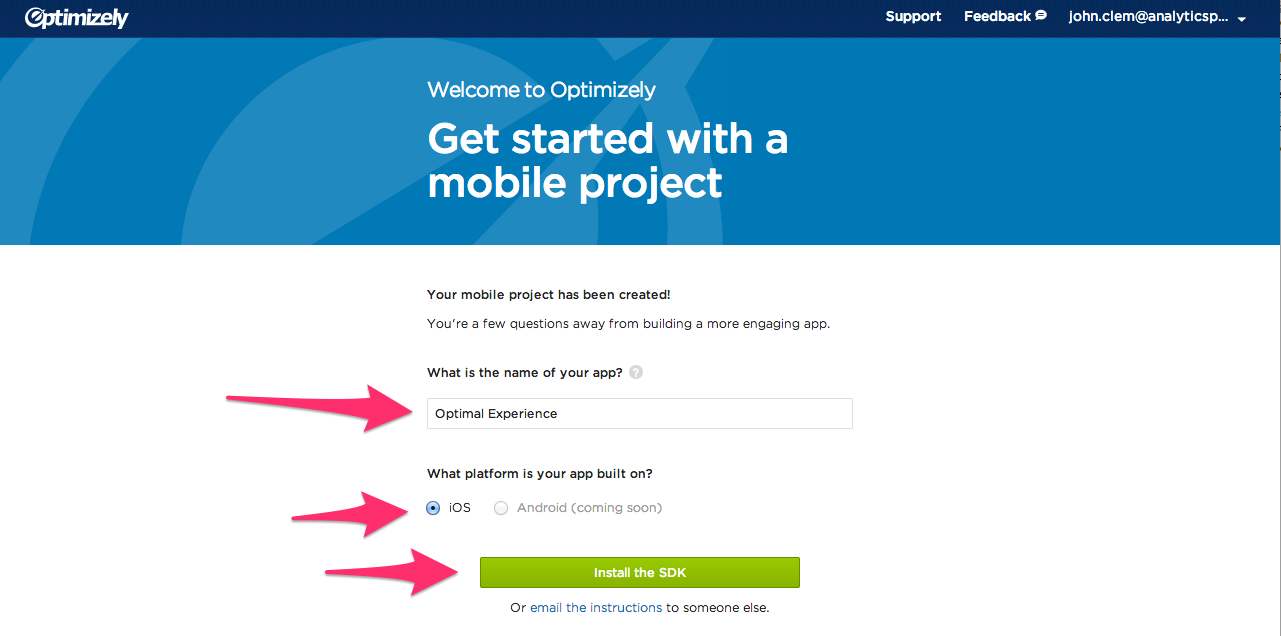
Now, create your first project. Choose the “iOS Project” type and enter “Optimal Experience” as the app name. [caption id="attachment_8547" align="alignnone" width="600"]
 Optimizely screenshot: account setup[/caption] [caption id="attachment_8545" align="alignnone" width="601"]
 Create an application and optimal experience[/caption]
3. Installing the Optimizely SDK Using Cocoapods
Install Cocoapods if you don’t already have it:
If installation fails, try again with SuperUser permissions:
| sudo gem install cocoapods |
Navigate to your project folder, create an empty file called “Podfile”, then open the file for editing:
| cd /Path/To/Xcode/Projects/Optimal Experience/touch Podfilenano Podfile |
Edit your Podfile so it looks like this:
| platform :ios, '8.0' pod 'Optimizely-iOS-SDK', '~> 1.0' |
Save the Podfile -- press ‘control+x’
Answer Yes to “Save modified buffer?” -- press ‘y’ key
Accept default file name -- press ‘Return’ key
Now, quit Xcode and run the install command:
Cocoapods will instruct you to use ‘Optimal Experience.xcworkspace’ from now on, so open that file in Xcode.
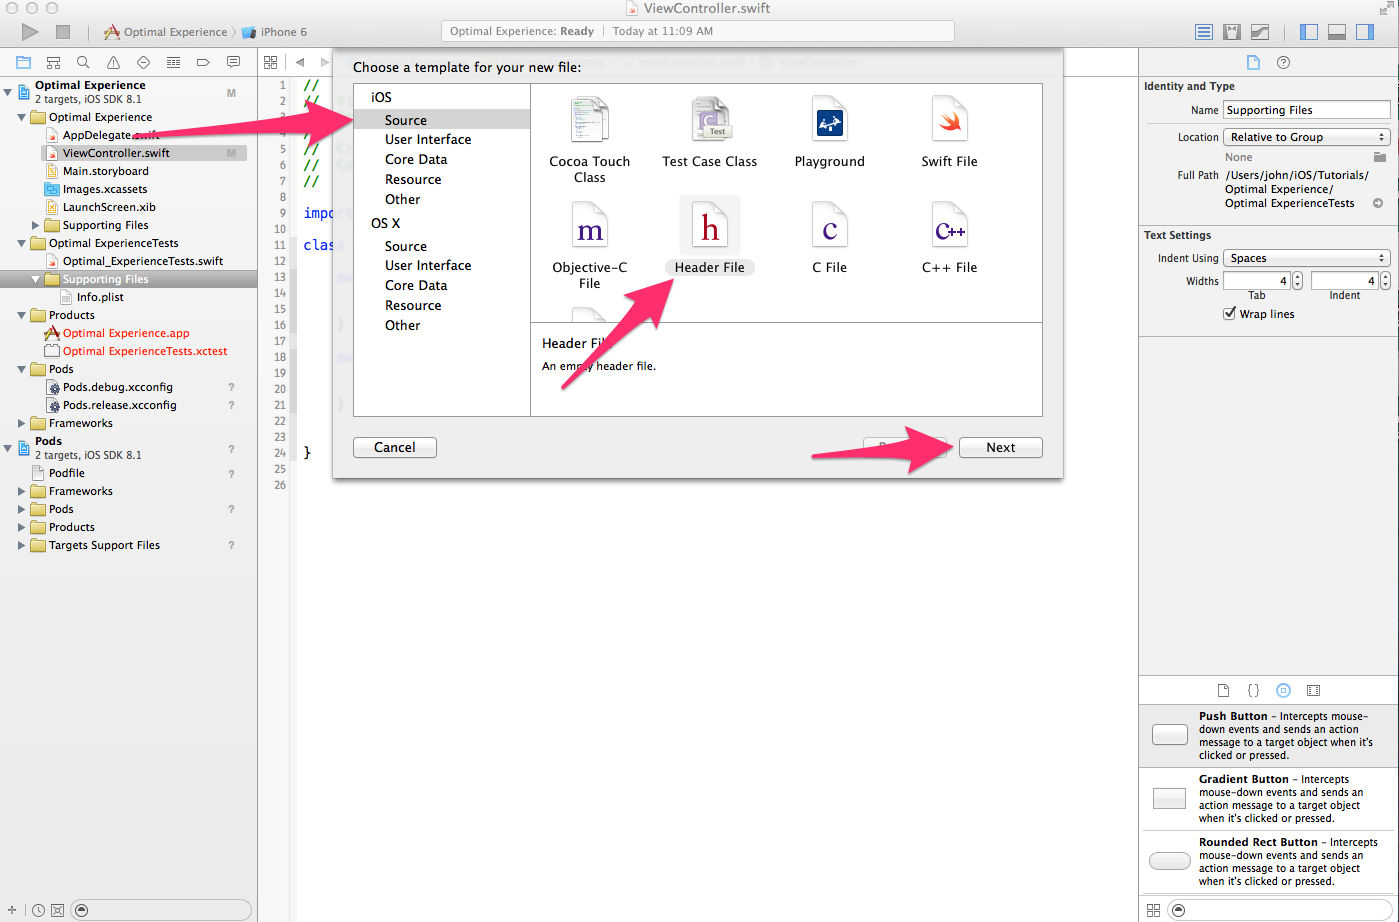
First, you’ll need to create an Objective-C Bridging Header, so that your Swift code can access the Optimizely Objective-C framework.
Click File->New File to open up the file template chooser. The select “Header File” under “iOS->Source” then click “Next” [caption id="attachment_8527" align="alignnone" width="600"]
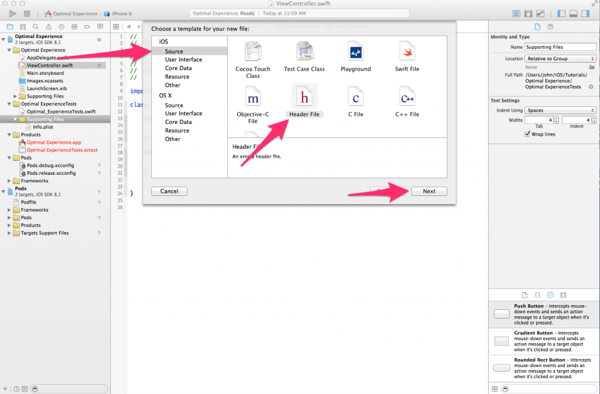 Choose a file template, select header file under iOS, then source[/caption]
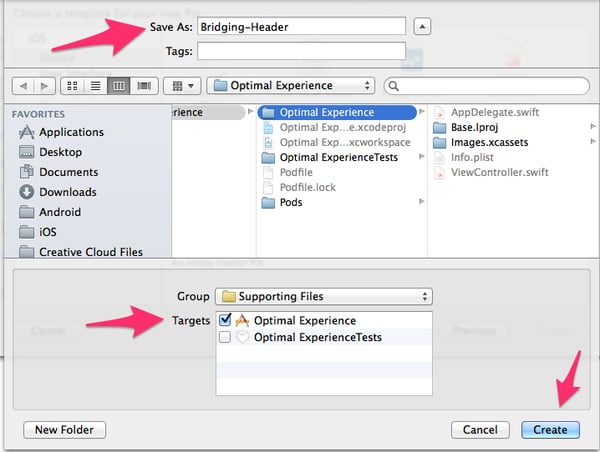
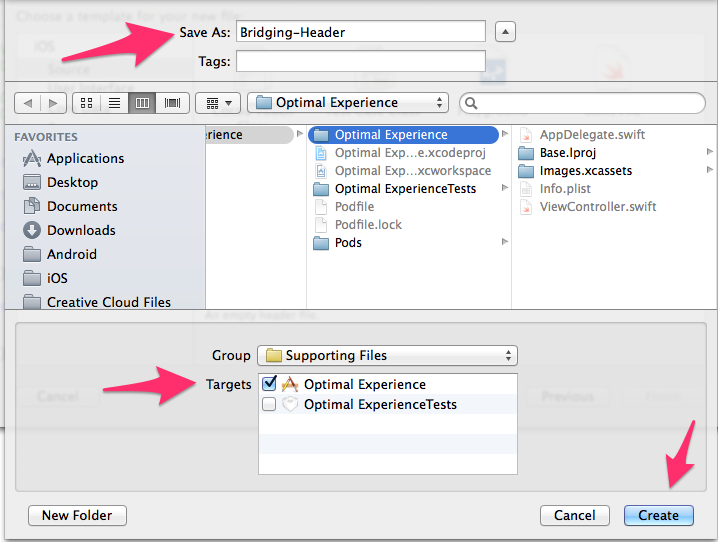
Name the file “Bridging-Header” and save it in the same folder as all of your app’s source code. Make sure the checkbox next to your app target is checked, then click “Create” [caption id="attachment_8561" align="alignnone" width="600"]
Choose a file template, select header file under iOS, then source[/caption]
Name the file “Bridging-Header” and save it in the same folder as all of your app’s source code. Make sure the checkbox next to your app target is checked, then click “Create” [caption id="attachment_8561" align="alignnone" width="600"]
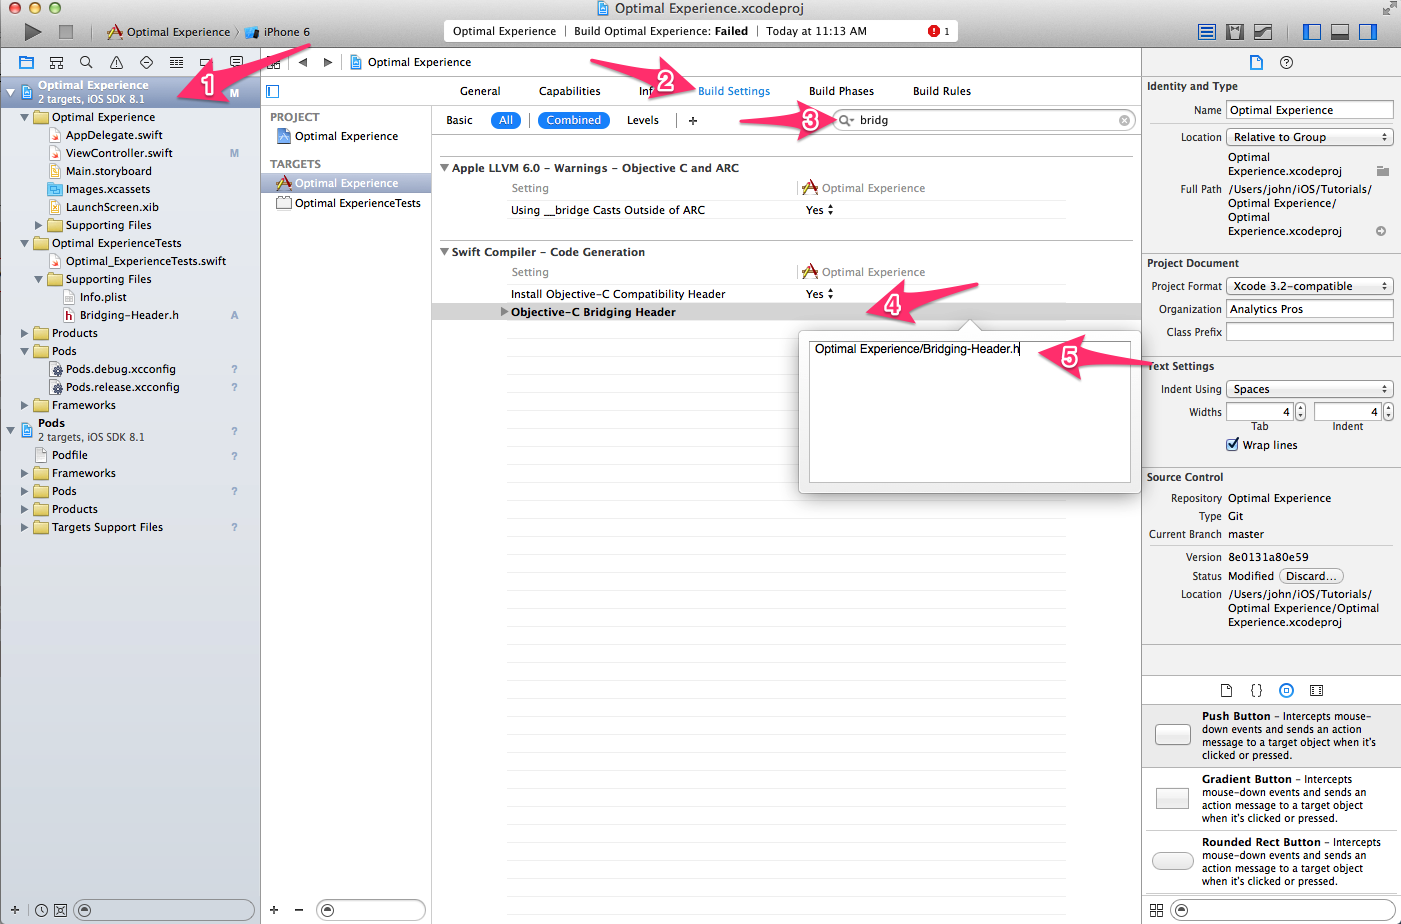
 Save as bridging-header[/caption] Now we just need to let Xcode know about our new bridging header file with the following quick steps:
- Click on your blue project icon in the top left corner of the project navigator
- Navigate to “Build Settings”
- Ensure that “All” is selected and type “bridging” in the search field
- Double-click the empty field next to “Objective-C Bridging Header”
- Enter this path: Optimal Experience/Bridging-Header.h
[caption id="attachment_8539" align="alignnone" width="601"]
 Optimizely screenshot: showing how to navigate build settings and enter optimal experience[/caption] Next, open up Bridging-Header.h and replace it’s contents with the following:
| //// Bridging-Header.h// Optimal Experience // #import <UIKit/UIKit.h> #import "Optimizely.h" |
Now, click Product->Build (Command+B) and if all went well, your app should build without any errors.
4. Start Optimizely in AppDelegate.Swift
Open your AppDelegate.swift file. The first method in the file (application:didFinishLaunchingWithOptions:) is a placeholder method, used for any setup/configuration your app needs to perform when it is launched.
Add a call to start optimizely so that your didFinishLaunching… method looks like this:
| func application(application: UIApplication, didFinishLaunchingWithOptions launchOptions: [NSObject: AnyObject]?) -> Bool {// Override point for customization after application launch.let optimizelyKey = "YOUR_OPTIMIZELY_API_KEY_GOES_HERE" Optimizely.startOptimizelyWithAPIToken(optimizelyKey, launchOptions: launchOptions) return true } |
5. Add a Custom URL Scheme for Optimizely
First, add the following method to your AppDelegate.swift:
| func application(application: UIApplication, openURL url: NSURL, sourceApplication: String?, annotation: AnyObject?) -> Bool {return Optimizely.handleOpenURL(url)} |
This method is called when a URL with a given scheme is opened by any app on the iPhone. For example, if you clicked a link in an email that looked like this: tel://2065555555 it will call the application:openURL… method of the Phone app.
In the next step, we’ll add our own custom URL scheme so that your app will respond to any URL opened on the device that starts with your Optimizely URL scheme (the scheme is shown on
https://www.optimizely.com/mobile/install and looks something like this: optly0123456789)
- Click your Project icon
- Select your app target
- Click “Info”
- Expand the “URL Types” box
- Click the “+” button
- Fill in the Identifier field
- Fill in the URL Schemes field
[caption id="attachment_8541" align="alignnone" width="600"]
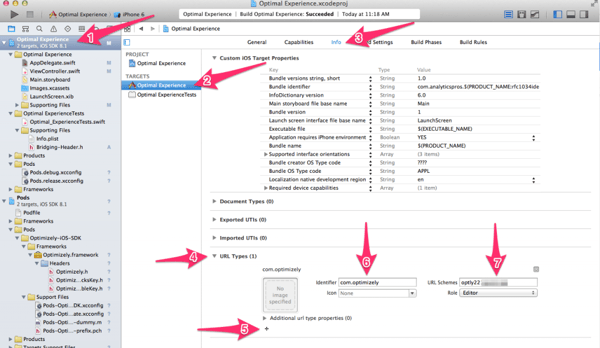 Optimizely screenshot: fill in identifier field and URL schemes field[/caption] Now, build and run your app (Product-> Build & Run, or Command+R) and if all goes well, you should see the following on the
https://www.optimizely.com/mobile/install page: [caption id="attachment_8553" align="alignnone" width="600"]
Optimizely screenshot: fill in identifier field and URL schemes field[/caption] Now, build and run your app (Product-> Build & Run, or Command+R) and if all goes well, you should see the following on the
https://www.optimizely.com/mobile/install page: [caption id="attachment_8553" align="alignnone" width="600"]
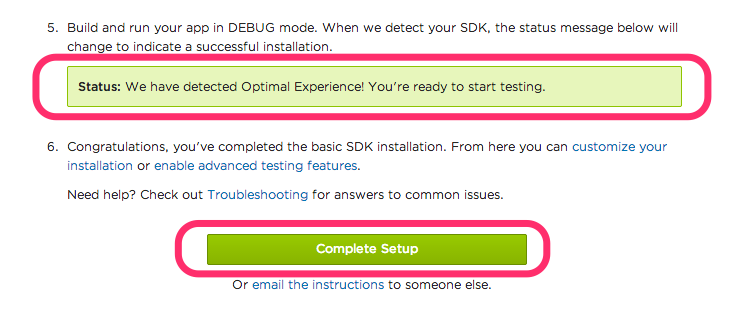
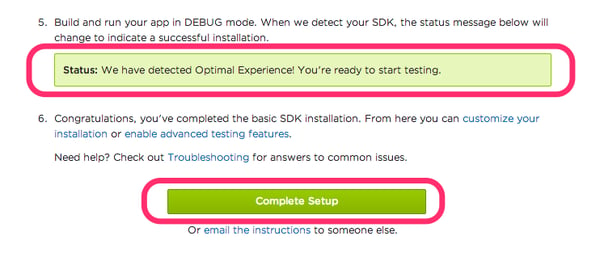 Optimizely screenshot: build and run your app in DEBUG mode[/caption]
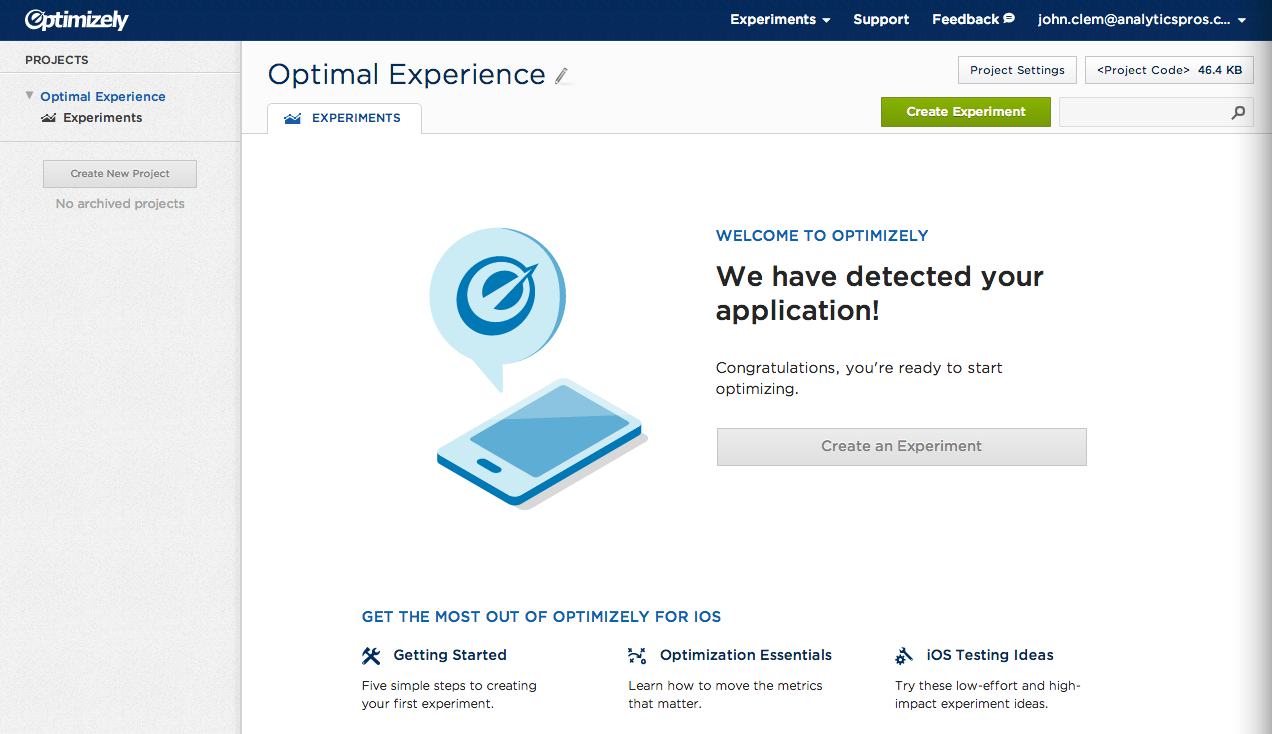
Click “Complete Setup” and you should be taken to a screen like this: [caption id="attachment_8549" align="alignnone" width="601"]
Optimizely screenshot: build and run your app in DEBUG mode[/caption]
Click “Complete Setup” and you should be taken to a screen like this: [caption id="attachment_8549" align="alignnone" width="601"]
 Optimizely screenshot: Click Complete Setup and you will be taken to a screen that says we have detected your application[/caption]
6. Create Your First Experiment
Click “Build & Run” (Command+R) to launch your app in the iOS Simulator.
Using your mouse, click and drag to draw an “O” and you should be redirected quickly to Safari and then back into your app, but now you’ll have a small “Edit” menu at the top of the screen [caption id="attachment_8579" align="alignnone" width="601"]
 Click and drag to draw an “O” and you’ll be redirected to Safari and then back into your app with an“Edit” menu at the top of the screen[/caption]
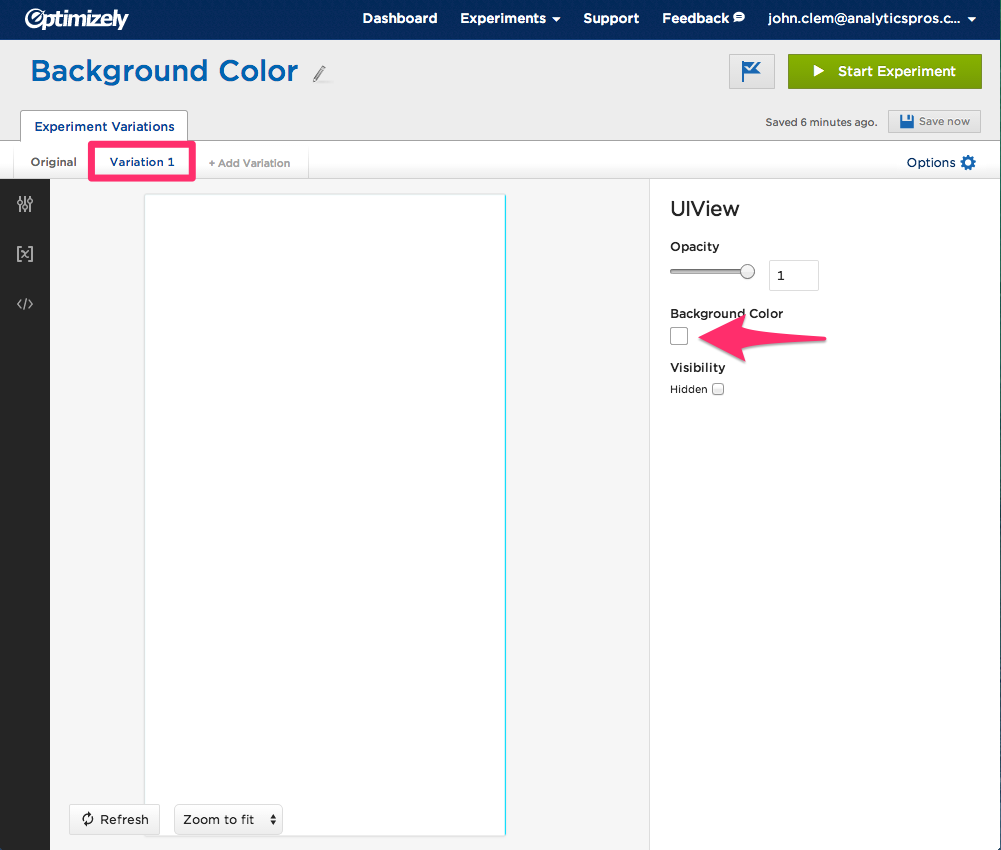
Optimizely has generously created your first Variation for you (appropriately named “Variation 1”). Click in the blank app canvas to load the inspector panel, then click the white box below “Background Color” [caption id="attachment_8531" align="alignnone" width="600"]
Click and drag to draw an “O” and you’ll be redirected to Safari and then back into your app with an“Edit” menu at the top of the screen[/caption]
Optimizely has generously created your first Variation for you (appropriately named “Variation 1”). Click in the blank app canvas to load the inspector panel, then click the white box below “Background Color” [caption id="attachment_8531" align="alignnone" width="600"]
 Optimizely creates your first variation for you[/caption]
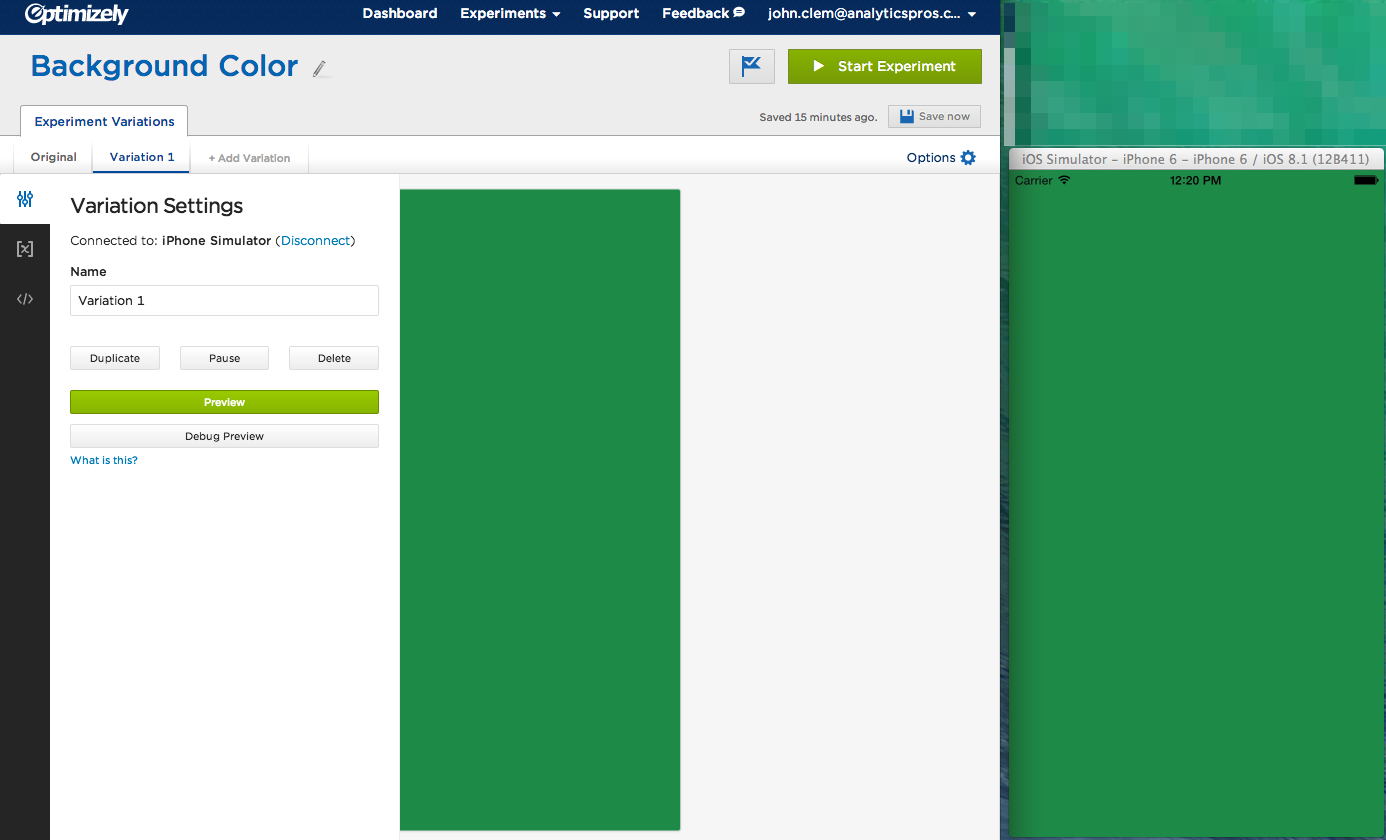
Pick a color, and you should see the background instantly change on your iOS simulator to match your newly selected color. [caption id="attachment_8555" align="alignnone" width="600"]
Optimizely creates your first variation for you[/caption]
Pick a color, and you should see the background instantly change on your iOS simulator to match your newly selected color. [caption id="attachment_8555" align="alignnone" width="600"]
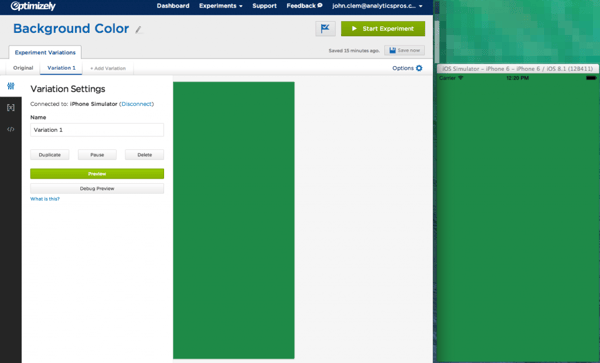 Pick a color, any color![/caption] Congratulations! You’ve setup Optimizely from scratch in a brand new iOS app (using Swift, no less!).
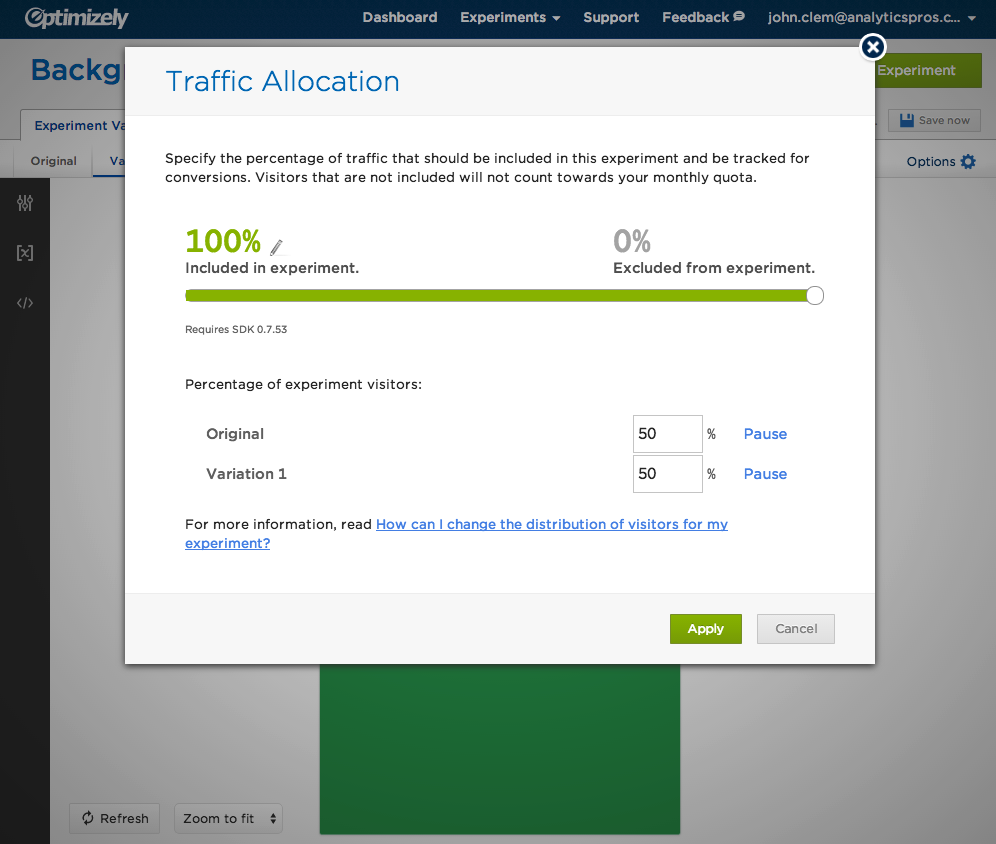
From here you can begin designing your content experiments, assign traffic allocation percentages, and quickly tweak and fiddle with your UI without needing to open up Xcode and modify your source code and/or your Storyboard. [caption id="attachment_8535" align="alignnone" width="601"]
Pick a color, any color![/caption] Congratulations! You’ve setup Optimizely from scratch in a brand new iOS app (using Swift, no less!).
From here you can begin designing your content experiments, assign traffic allocation percentages, and quickly tweak and fiddle with your UI without needing to open up Xcode and modify your source code and/or your Storyboard. [caption id="attachment_8535" align="alignnone" width="601"]
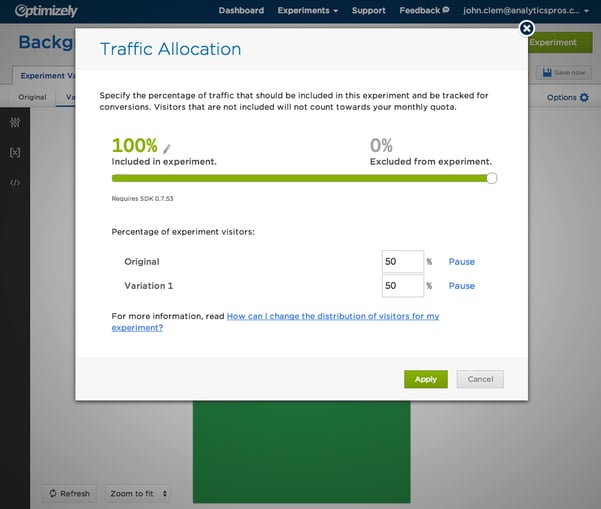 Design content experiments, assign traffic allocation percentages, and tweak your UI without opening up Xcode to modify your source code and/or your Storyboard.[/caption]
In a future tutorial, we’ll take a deep dive and go beyond this simple background-color content experiment. We’ll explore Code Blocks, Live Variables and Optimizely integrations (such as Google Analytics).
Design content experiments, assign traffic allocation percentages, and tweak your UI without opening up Xcode to modify your source code and/or your Storyboard.[/caption]
In a future tutorial, we’ll take a deep dive and go beyond this simple background-color content experiment. We’ll explore Code Blocks, Live Variables and Optimizely integrations (such as Google Analytics).
%20(1).png?width=2500&height=1667&name=Portal%20Drop%20Down%20(1)%20(1).png "Take a Tour of Adswerve Connect")


 Optimizely: choosing a template for your new project[/caption]
On the next screen, fill out the form, using “Optimal Experience” for the Product Name and Swift for the Language. Use whatever info you like for the other fields. [caption id="attachment_8559" align="alignnone" width="600"]
Optimizely: choosing a template for your new project[/caption]
On the next screen, fill out the form, using “Optimal Experience” for the Product Name and Swift for the Language. Use whatever info you like for the other fields. [caption id="attachment_8559" align="alignnone" width="600"]
 Choose options for your new Optimizely projec[/caption]
 Optimizely screenshot: account setup[/caption] [caption id="attachment_8545" align="alignnone" width="601"]
 Create an application and optimal experience[/caption]
 Choose a file template, select header file under iOS, then source[/caption]
Name the file “Bridging-Header” and save it in the same folder as all of your app’s source code. Make sure the checkbox next to your app target is checked, then click “Create” [caption id="attachment_8561" align="alignnone" width="600"]
Choose a file template, select header file under iOS, then source[/caption]
Name the file “Bridging-Header” and save it in the same folder as all of your app’s source code. Make sure the checkbox next to your app target is checked, then click “Create” [caption id="attachment_8561" align="alignnone" width="600"]
 Save as bridging-header[/caption] Now we just need to let Xcode know about our new bridging header file with the following quick steps:
 Optimizely screenshot: showing how to navigate build settings and enter optimal experience[/caption] Next, open up Bridging-Header.h and replace it’s contents with the following:
 Optimizely screenshot: fill in identifier field and URL schemes field[/caption] Now, build and run your app (Product-> Build & Run, or Command+R) and if all goes well, you should see the following on the
https://www.optimizely.com/mobile/install page: [caption id="attachment_8553" align="alignnone" width="600"]
Optimizely screenshot: fill in identifier field and URL schemes field[/caption] Now, build and run your app (Product-> Build & Run, or Command+R) and if all goes well, you should see the following on the
https://www.optimizely.com/mobile/install page: [caption id="attachment_8553" align="alignnone" width="600"]
 Optimizely screenshot: build and run your app in DEBUG mode[/caption]
Click “Complete Setup” and you should be taken to a screen like this: [caption id="attachment_8549" align="alignnone" width="601"]
Optimizely screenshot: build and run your app in DEBUG mode[/caption]
Click “Complete Setup” and you should be taken to a screen like this: [caption id="attachment_8549" align="alignnone" width="601"]
 Optimizely screenshot: Click Complete Setup and you will be taken to a screen that says we have detected your application[/caption]
 Click and drag to draw an “O” and you’ll be redirected to Safari and then back into your app with an“Edit” menu at the top of the screen[/caption]
Optimizely has generously created your first Variation for you (appropriately named “Variation 1”). Click in the blank app canvas to load the inspector panel, then click the white box below “Background Color” [caption id="attachment_8531" align="alignnone" width="600"]
Click and drag to draw an “O” and you’ll be redirected to Safari and then back into your app with an“Edit” menu at the top of the screen[/caption]
Optimizely has generously created your first Variation for you (appropriately named “Variation 1”). Click in the blank app canvas to load the inspector panel, then click the white box below “Background Color” [caption id="attachment_8531" align="alignnone" width="600"]
 Optimizely creates your first variation for you[/caption]
Pick a color, and you should see the background instantly change on your iOS simulator to match your newly selected color. [caption id="attachment_8555" align="alignnone" width="600"]
Optimizely creates your first variation for you[/caption]
Pick a color, and you should see the background instantly change on your iOS simulator to match your newly selected color. [caption id="attachment_8555" align="alignnone" width="600"]
 Pick a color, any color![/caption] Congratulations! You’ve setup Optimizely from scratch in a brand new iOS app (using Swift, no less!).
From here you can begin designing your content experiments, assign traffic allocation percentages, and quickly tweak and fiddle with your UI without needing to open up Xcode and modify your source code and/or your Storyboard. [caption id="attachment_8535" align="alignnone" width="601"]
Pick a color, any color![/caption] Congratulations! You’ve setup Optimizely from scratch in a brand new iOS app (using Swift, no less!).
From here you can begin designing your content experiments, assign traffic allocation percentages, and quickly tweak and fiddle with your UI without needing to open up Xcode and modify your source code and/or your Storyboard. [caption id="attachment_8535" align="alignnone" width="601"]
 Design content experiments, assign traffic allocation percentages, and tweak your UI without opening up Xcode to modify your source code and/or your Storyboard.[/caption]
In a future tutorial, we’ll take a deep dive and go beyond this simple background-color content experiment. We’ll explore Code Blocks, Live Variables and Optimizely integrations (such as Google Analytics).
Design content experiments, assign traffic allocation percentages, and tweak your UI without opening up Xcode to modify your source code and/or your Storyboard.[/caption]
In a future tutorial, we’ll take a deep dive and go beyond this simple background-color content experiment. We’ll explore Code Blocks, Live Variables and Optimizely integrations (such as Google Analytics).