
With Google's recent Vertex AI release, you may be wondering exactly how to build Vertex AI custom containers to serve predictions. To help, we dug in and explored how you can best utilize this exciting new platform with minimal effort. Ready to get technical?
So, what is Vertex AI anyways?
I'll refer to Google's documentation on this one: "Vertex AI brings together the Google Cloud services for building ML under one, unified UI and API." Vertex AI is the best place for users to operationalize machine learning by using modern and updated technologies in a friendly interface.
What is a Vertex AI custom container and why do I need one?
Google has built several containers that come pre-built and ready to run in Vertex AI. While these are great, the model you built might not fit perfectly into their container. You might have more complex system dependencies, require non-standard libraries or any other number of variables. While Google's pre-built containers are exceptional, it's simply impossible to meet everyone's needs with standardized solutions. Thankfully, they allow us to build custom containers that will function just like their pre-built containers so long as they meet the interface requirements that Google has set forth.
In very simple terms, the architecture of the Vertex AI's model server is as follows. First, we will upload a custom, serialized machine learning model to Vertex AI. Then we will deploy that model to a web server that will accept HTTP requests with "instances" (items that we want the machine learning model to predict on) as JSON objects in the request body. The system will then need to process those instances, serve them to our machine learning model and return the predictions that the model makes in JSON format.
The best way to capture all of these separate pieces in a clean way is to create a Docker container. Docker is a modern framework that uses a set of instructions to give to a small instance of an operating system a special task. In our case, for example, we will write instructions for Docker to build a small operating system that can run python scripts, next we will have it pip install all of the proper python libraries, then we will run our server on that small OS instance called a container. This process makes the entire system much more compact and portable.
More details, please…
We have a high-level idea of the system, but there are several strict instructions that Google has asked us to follow in order for Vertex AI to properly interface with our Docker container. The first is the format of the web server. For the sake of demonstration, we will explain everything in the context of building a custom container that serves an sklearn ID3 decision tree trained for the popular Iris dataset.
Web Server
The webserver is like the air-traffic controller of your system. It makes sure that everyone (i.e. all of the separate pieces of the system) is doing their job at the right time and can prevent failure of the system if developed properly. In order to meet Google's specifications, they require the web server to serve two very specific routes: a health check route and a prediction route. In building our server, we decided to use the Tornado library as this was the library Google used in some of their sample containers. This is not required; you may use whatever you would like to build the server.
Health Checks
The health check route will accept a GET request. This request won't have any special information but will expect a response from the server informing it as to whether it is ready to take predictions or not. Here are a few things that the health check route might do, depending on your specific architecture:
- Ensure that the model has been properly deserialized
- After deserialization, make sure the model can serve predictions
- Check that no other instances are currently being served
- Make sure the server is able to accept other requests
- Anything else that you think needs to be done in order to properly serve predictions
After the health check route makes sure that the system is "healthy," it must return a status of '200, OK', per Google's specifications. If the system is not "healthy", it should return some other status: Google doesn't care what that status is as long as it's not '200, OK'. And that's it! The health check route functionality really is quite simple.
Sample Health Check Code
The following is an example of a health check handler as built in Python using the Tornado framework:
class HealthCheckHandler(tornado.web.RequestHandler):
  # Health checks only need to respond to GET requests
  def get(self):
    ready = True # a place holder for the logic that
                 #   determines the health of the system
    if ready:
      # If everything is ready, respond with....
      self.set_status(200, 'OK')
      self.write('200: OK')
      self.write(json.dumps({"is_healthy": True}))
    else:
      # If everything is NOT ready, respond with....
      self.set_status(503, 'Service Unavailable')
      self.write('503: Service Unavailable')
      self.write(json.dumps({"is_healthy": False}))
    # finish the response
    self.finish()
Serving Predictions
The prediction route is where things really start to get interesting. Here, the system will need to accept a POST request that contains JSON in the body. The JSON will look something like this:
{
  "instances": [
    {"a":1, "b":1, "c":1, "d":1},
    {"a":2, "b":2, "c":2, "d":2},
    . . .
  ],
  "parameters": [x, y, z]
}
Here we see that the JSON request has an instances list that represents the features that we would like to predict on and a parameters list that can be used to alter the functionality of the system in any way the developer desires. Please note that the request must be 1.5MB or smaller per Google's custom container requirements.
One key thing to note is that the instances will be served to the prediction route exactly as they are input into the system. In other words, the developer should account for the fact that instances might be served in the format {"a": 1, "b":1}, for example, instead of the format [1,1]. In reality, the developer controls what the system can and can't handle. It's essential, however, to make sure that, no matter what input comes into the system, it is parsed and cleaned in a way that the model can read it.
Once the data is parsed and formatted properly, it should then be pushed through the model and its predictions should be properly formatted. Google's custom container requirements state that the response can't be more than 1.5MB in size and should be in the following format:
{
  "predictions": [
    {"p":1},
    {"p":2},
    . . .
  ]
}
There are two things to note here. One is that the predictions, just like the instances can be formatted how the developer chooses. It simply must be a JSON list labeled "predictions". Two is that if we are sending a response greater than 1.5MB in size, we need to adjust and send back multiple responses in order to ensure we don't lose any predictions.
Sample Prediction Code
class PredictionHandler(tornado.web.RequestHandler):
  def __init__(
    self,
    application: "Application",
    request: tornado.httputil.HTTPServerRequest,
    **kwargs: Any
  ) -> None:
    # We decided to load our model in the prediction
    #   constructor. This is not mandatory
    super().__init__(application, request, **kwargs)

    # deserialize a model that can serve predictions
    #   (we used .joblib, this is not mandatory)
    # NOTE: the model used in this demo is a simple
    #   decision tree that predicts on the iris dataset.
    #   it's input expects a 2D array in the format
    #   [[1,1,1,1], [2,2,2,2], [3,3,3,3], ...]
    self.model = joblib.load('./model.joblib')


  # PredictionHandler only responds with predictions when
  #   called from a POST request
  def post(self):
    response_body = None
    try:
      # get the request body
      req_body = tornado.escape.json_decode(self.request.body)

      # get the instances from the body
      instances = req_body.get("instances", {})

      # if parameters don't exist, create a dummy dictionary
      parameters = req_body.get("parameters", {})

      # generate our predictions for each instance
      # NOTE: .tolist() is specific to our implementation
      #   as it matches the model we built
      predictions = self.model.predict(instances).tolist()

      # there may need to be extra steps to make sure the
      #   response is properly formatted (ex. .tolist() above)
      response_body = json.dumps({'predictions': predictions})

    # catch errors
    except Exception as e:
      response_body = json.dumps({'error:':str(e)})

    # set up the response
    self.set_header("Content-Type", "application/json")
    self.set_header("Content-Length", len(response_body))
    self.write(response_body)

    # send the response
    self.finish()
Sample Server Execution Code
def make_app():
  # Create the app and assign the handlers to routes
  tornado_app = tornado.web.Application([('/health_check', HealthCheckHandler),
                 ('/predict', PredictionHandler)],
               debug=False)
  tornado_app.listen(8080)
  tornado.ioloop.IOLoop.current().start()


if __name__ == '__main__':
  make_app()
Dockerfile
If the web server is the air-traffic controller, the dockerfile is the airport. It is the element of the system that ensures our OS environment has all of the requirements needed for our web server to run properly (think downloading libraries and dependencies for our web server). The dockerfile will seem confusing and intimidating to those who have never used one, but here are some things you might consider instructing Docker to do when building the dockerfile to get you started:
- Set the working directory
- Copy the necessary files (i.e. our web server script, helper modules, etc.) into the OS environment
- Pip install required python libraries
- Downloading the Google Cloud CLI so we can use the command line to copy/upload any necessary files from GCP
- Expose the port that the server will listen on
- Run the script that builds the web server
Sample Dockerfile
FROM python:3.8

WORKDIR = .

COPY . .

# Install pip reqs from both user and default
# NOTE: for this implementation, default-reqs.txt specifies
#   the tornado, scikit-learn, and joblib libraries in
#   the format: [library]==[version]. Build the default-reqs.txt
#   file to match your needs
RUN pip install -r default-reqs.txt

# Expose port 8080
EXPOSE 8080

# The command to start the system
ENTRYPOINT ["python3", "modelserver.py"]
Deploying the Container
Once you have built your container, you should deploy it to the container registry so that it can be hosted on the Vertex AI platform. There are a couple ways to do this, but we recommend using Google's command line interface (download by following these instructions). Once the CLI is installed, authorize your system by using the:
gcloud auth login
command. Next, you will need to tag the docker container with your Google Container Registry location with a command similar to
docker tag current/container_name:0.0 \ gcr.io/container/registry/location/container_name:0.0.
Finally, push that container to the container registry with the command:
docker push gcr.io/container/registry/location/container_name:0.0.
The container will then be pushed to Google Cloud.
Now that our container is accessible in the Google Cloud Platform, we will deploy it by following these steps:
- Navigate to Vertex AI > Models in the Google Cloud Console
- Select Import
- Name your model, select Continue
- Select Import an existing custom container
- Select BROWSE under Container image and find the correct container in the Container Registry
- Select BROWSE on the Model Artifact Storage field and select the correct Google Cloud storage path for you model artifacts
- Set the Prediction route, Health route and Port to /predict, /health_check, and 8080, respectively
- Select IMPORT
The model might take a little while to upload. You should receive an email when the upload process is complete. Then, you will need to deploy it to an endpoint so that it can receive requests by following these steps:
- Navigate to the deployed model
- Press DEPLOY TO ENDPOINT
- Select Create new endpoint and name the endpoint
- Select the Machine type
- Make sure the boxes under Logging are checked
- Press Continue
- Press DEPLOY
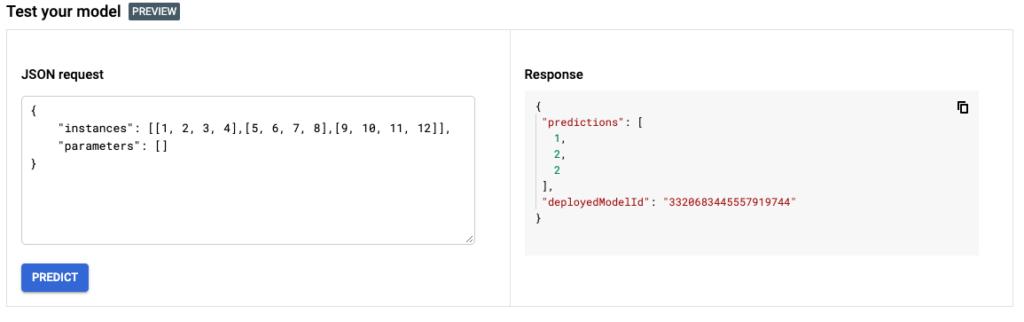
After the model deploys to an endpoint, you will again receive an email. You can then serve predictions through batch files or online in Google's Vertex AI interface.
Conclusion
This is, by no means, a step-by-step instruction on how exactly to build a custom Vertex AI container. However, we outlined the general setup behind it. Remember that a custom container is meant to be just that: custom. Make this container your own! Your model is unique, so your container should be, too. Don't be afraid to experiment with the architecture of the system. So long as you meet Google's custom container requirements, the rest is up to you. Now get out there and build an amazing Vertex AI Custom Container!
Questions? Feel free to reach out and we’ll be in touch.